
When it comes to presenting your work you really need to be able to take good photos. Now don’t get me wrong, you don’t always need the worlds best camera, most of my pictures are taken with my mobile phone (Samsung Galaxy S7) and I have taken some of my best pics with it too as it has one of the best lenses for a mobile device out there.
But if you don’t want to upgrade your device to take pictures then there is a way to improve your work, it’s one of the best tools in the photographer’s arsenal… light!
Getting or building a lightbox will dramatically improve the quality of your pictures.
How can I build a lightbox if I can’t afford to buy one? You can build one very easily with very little cost using the following items:
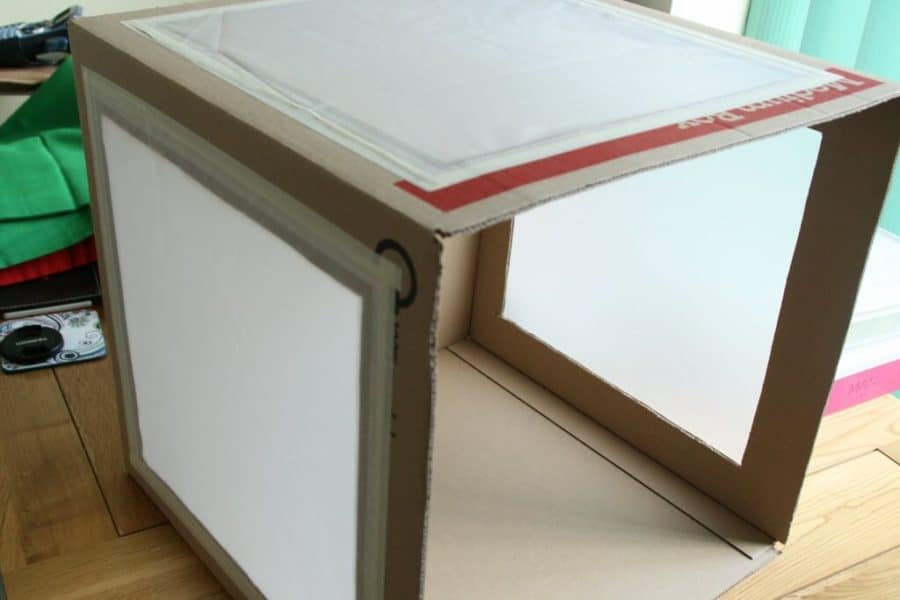
- Cardboard box – Think about what you will be photographing and obtain a box at least double the size of what you will put inside
- Sharp knife – Needed to cut holes in the sides of the box and to cut the material for the sides
- Masking tape and/or glue – Needed to fix the material to the sides of the box
- Translucent material – To diffuse the light coming into the box to give a soft gentle light
- Velcro – Placed at the back of your light box to keep its shape and so you can store it flat if space is an issue
So let’s have a run through the process to see what we need to do. If you just want to buy a lightbox you can do so from Amazon here. If you want to build a box for under $10 read on.
Cutting the box
Selecting the right box is important as you want good rigidity in your box as you will be cutting out large areas of the box which will weaken the structure quite a bit. The best boxes to use are those you would use from a removal company. These boxes are strong and durable and only a few dollars.
Measure out the areas you wish to cut on the box. If your box is large enough measure 2 inches in from each edge so after you have cut out the square you will have a reasonably strong edge to secure your material.
Once you have cut out three panels, top, left and right then you can move on to measuring your material.
Cutting the translucent material
To make the translucent sides of my box I wanted a material that could stand up to a bit of movement so using paper was not my first choice. I got a cheap laundry basket from Ikea ($6) and used that. It was translucent polyester so it was perfect for diffusing the light.
Measure your material against the holes you have made in the box and cut each panel leaving an extra 1 inch of material around each edge. This is important so you will have enough material to fix each panel securely to the box on all 4 sides.
Fixing the material to the box
I used masking tape for my lightbox which was ok but I needed to make the tape double-wide around the edges just to feel comfortable that the material was not going to come undone which it did not.
If like me, you want to do an absolutely top job then I recommend running a bead of glue around the edge of the box and then taping the panel into place, the glue and the tape combined will stop your lightbox from falling apart.
Making your light box foldable for easy storage
If you don’t have the luxury of large living space (I don’t) then you may want to make your lightbox fold easily to avoid you having to keep re-taping your box every time you use it. Doing this will reduce the lifespan of your box considerably.
What I did was fix velcro to the flaps of the box so I could quickly assemble and disassemble the box as needed.
I got some sticky back velcro and cut it into small pieces about an inch long but only about 1/2 of an inch wide. You need the velcro to stick but also not to damage the box when unsticking it.
I placed the box face down with the opening at the bottom and lifted the outer 2 flaps. on the inside flaps, I fixed the velcro to the middle of the inside flaps but close to the outside edge of the box.
I then fixed velcro to the underside of the outside flaps on the corners, where they would meet the middle of the inner flaps. Once I was satisfied the velcro lined up. I secured the velcro with a needle and thread sewing each piece to the cardboard to ensure it remained secure and would not damage the box by coming apart easily.
Using your light box
I later fixed some of the translucent material to the back of the box at the top so I could have a sweeping light backdrop. The material was double the height of the box so I could avoid any hard edges which may trap light when the material was placed under the subject.
Before 
After
As you can see from the 2 images, they look drastically different when light is added, the image on the left looks alright but feels devoid of feeling and a bit washed out. The image on the right, however, feels warmer and the colors seem to pop more.
To get this effect with the lightbox you need to add some soft exterior lighting. I used 2 cheap desk lamps which I could clamp to most surfaces (check them here on Amazon). The lamps are fully poseable which lets you play with your light sources in many different ways to get some great effects.
Can I make a light box from wood?
Of course, it will be much more robust and you can make it using very thin plywood and piano hinges to allow it to collapse down for storage.
Cut 5 panels from a sheet of plywood, how big is up to you but you only need to allow an inch around the hole instead of 2 as the frame will be much stronger.
Measure and cut the holes in the box as you would do so with the cardboard version. You will now have 3 panels with holes and 2 without. Fix 3 of the panels with the hole in and one of the panels without in a line using the piano hinges which you also cut to size.
Now you should have a line of 4 panels all fixed together. Take the leftmost edge of the leftmost panel and bring it to the rightmost edge of the rightmost panel and fix them together with another piano hinge. You should now have a square with no front or back.
Taking your last panel fix it to the top of the back panel of your box shape. The three panels with holes in should form the top and sides of your box with the panel without the hole being on the bottom.
Fix the last panel to the top panel with another piano hinge. Now you should have a box that can flatten when you lift up the back panel and let the square fold down. To keep the box from folding down when you want to use it fix a hook to one side of the square and an eye to the back panel, this will let you use the box and fold it securely when not needed.
Conclusion
You don’t need to spend hundreds of dollars to get some amazing and efficient equipment. Today we made a lightbox for under $10, compared to the cost of a cheaper and smaller premade one ($40) and using many items that you would have in your home already.
